Showing posts with label Hair. Show all posts

Monday, 10 March 2014

Double Side Twists

I love these Double Side Twists - they are incredibly easy and look good too perfect for any day of the week! 


1) Make a middle or side parting.  

2) Take a section  of hair from the front of the face and begin by twisting.  

3) Add a small section of hair into the twist as you move towards the back of the head.

4) Secure the twist using a small hair tie and repeat on the other side.

5)  Once you have finished the twists secure together and add a flower or other clip! 


Love Sophie...xxx

PS: You can follow me on Pinterest, Facebook, Twitter, Bloglovin & Instagram too! Phew! 

Monday, 10 February 2014

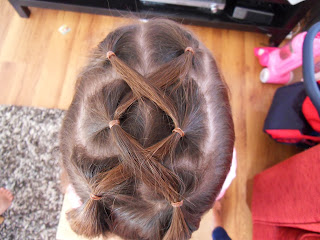
Girls Hairstyles - Cross Overs

I absolutely love this hairstyle technique!  it is really easy to achieve and very versatile.  it is also good for younger girls who have quite fine hair.  You can basically do as many 'cross-overs' as you like or as many as you can fit! 


1) Section the hair into a middle parting. Using some small rubber bands make a square shape at the front of the head and tie into a mini ponytail - one on each side.


2) Create a second 'square' behind one of the first ponytails and take the first ponytail made diagonal to the parting of hair you are working on and tie the original ponytail into the new ponytail.  Repeat on the other side of the parting.


3) Repeat process 2 as many times as you like.  You can use coloured hair bands or just plain ones which match the colour of your child's hair.


Have Fun! 

Love Sophie...xxx


Tuesday, 7 January 2014

Double Side Braids

If like me you have a little girls (or big ones) you might get a little bored of creating the same old hairstyles everyday so here is a good one for you to try.  Once you have the hang of French braiding you will find this comes as second nature!


1) Part the hair down the middle and take a small section of hair from near the face.

2) Divide the small section of hair into three pieces and cross over into the beginnings of a plait/braid.

3) When you have crossed over all three sections once take a new section of hair from the parting and add it to the braid as if you are making a french plait.  Do not add another section from the other side.

4) Continue to braid this way adding a small section of hair from the parting until you reach the back of the head.

5) Once you have braided as far as you want to go, finish off by braiding the section of hair you have left to the bottom and tie off.

6) Repeat these steps on the other side.

If you like this hairstyle please check out my other tutorials here...Love Sophie..xxx

Monday, 18 November 2013

Girls Hairstyles - Waterfall Braid

Waterfall Braid

Good morning everyone and Happy NaBloPoMo#18! I hope you had a great weekend?! 


Today I am featuring a waterfall braid/plait for my hair tutorial.  If you have a fringe this can be used to keep it off your face.  This hairstyle can be a little tricky especially if you have hair like my daughter Brooke which is very shiny and slippery In this photo I have left her fringe on the right hand side to frame her face and have used the hair on the left side where it is longest.


1) Take a small section of hair above the temple and begin a French type braid only taking and adding hair from the top of the head.
2) Once you have one complete crossover, drop a section from the bottom braid section to create a 'waterfall'.
3) Carry on with the braid dropping a small section from every bottom crossover as you go.
4) Go round the head as far as you like and finish off the braid with a normal plait down to the end of the length of the hair.
5) Tie the plait at the end with a hair tie.

Monday, 11 November 2013

My Hairstyle - Messy Bun With Flower


Its NaBloPoMo # 11 today and I have been posting a lot of my girls hairstyles on my blog recently so I thought I'd change it up a bit and put one of my hairstyles on here for you. Basically I have been wearing my hair in a messy bun a lot lately as I am trying to stay away from over styling it and in this photo I have added a flower.  If you are 'hair-challenged' like me you will find this is really easy and should only take 5 mins to put up!

1) Pull your hair back into a high ponytail and tie with hair tie but instead of pulling your hair all the way through on last twist leave it tucked in.

2) Pin the hair against your head using bobby pins giving the effect of a loose/messy bun.

3) Add flower or clip of your choice for a bit of interest! :)

Monday, 4 November 2013

Girls Hairstyles - Double Braided Buns


Welcome to my contribution to NaBloPoMo #4 - This is a great hairstyle to keep hair away from the face and one which I use when Brooke has her Modern dance lessons.


1) Create a straight centre parting and pull each side into a tight pony tail using hairspray or gel spray to keep away fly-aways and hold hair back.

2) Plait/braid both pony tails individually and tie at the bottom.

3)  Carefully wrap the plaited/braided ponytail around itself and pin in place with bobby pins.


You can also add a bit of decoration to this hairstyle by using brightly coloured hair clips or bows.  I do this for a bit of interest sometimes by clipping bows under each bun or just one bow to the front of a bun which gives a cute Hello Kitty look - I will take some photos next time I do this and post them so you can understand what I mean a bit better! Thanks for checking out this post! 

Monday, 28 October 2013

Girls Hairstyles - Ribbon Braid

This is a really easy braid to achieve (I think they call it a looney braid in America).  You can use any colour ribbon just make sure it is long enough to get to the end of your braid.  I've used just over a metre of ribbon in this photo.


1) Create a low pony tail and tie using an elastic band.  

2) Tuck your ribbon under the elastic band and pull through half the ribbon so you have two ribbon lengths of an equal size. Wrap the ribbon around the elastic band to hide and tie in place.

3) Divide the ponytail in to two sections and using the ribbon as you would the third section of hair normally, plait the hair but not too tightly.

4) When you reach the end of the braid tie the hair using the remaining ribbon and create a bow.

5) Holding the end of the braid where the bow is, pull out each side of the braided hair from the top down, to create a wriggly/wavy effect. 

Monday, 21 October 2013

Girls Hairstyles - Triple Side Topsy Tail


This is a really simple hair style to achieve and is great for keeping the hair away from the face.  If you have a topsy tail this will make the hair style really quick and easy to create - See picture below: 


Topsy Tail
1) Make a side parting and create another parting parallel to it.  Clip the leftover hair underneath out of the  way from the section of hair you want to work with.

2) Using your comb create the first square section of hair nearest to the face and tie with a small hair tie.

3) Continue this process two more times heading towards the back of the head.

4) Using a small topsy tail thread it through from the top of each pony tail behind the hair tie and under.  Pull the pony tail through the topsy tail in a downwards motion.  Follow this step for all three pony tails.


Monday, 14 October 2013

Girls Hairstyles - Wrap-Around French Braid Into Hair Rose


Gorgeous!
So this is my take on a Wrap-Around French Braid which ends in a very pretty hair rose! This hairstyle looks complicated and intricate but in fact it was quite easy to achieve!


1) Create a side parting and starting from the side with the largest section of hair begin a French plait/braid.


2) Continue to French braid around the back of the head trying to stay in the middle of the head as you go and aim for just above the top of the ear.


3) When you have reached the other side of the head finish off the French braid by creating a standard plait and tie off to hold in place.


4) Twist the braided end into a neat circle creating the 'rose' and pin in place using bobby pins.


Monday, 7 October 2013

Girls Hairstyles - French Braid Into Pony Tail

For something a little different try this take on the staple ponytail.  This style is perfect for keeping a fringe/bangs off your face and also gives a great twist to your up do!


1) Make a side parting in hair and French braid/plait down one side incorporating any short sections of hair.

2) Once you have reached the back of the head tie off the braid to keep it from coming undone.

3) Comb the rest of the hair into a neat pony tail and using a second hair tie make the pony tail making sure you include the braided section.

4) Take a small piece of the tied ponytail around 1-1.5cm wide and wrap around the hair band to hide, pin the wrapped around hair in place using a bobby pin.


Monday, 30 September 2013

Girls Hairstyles - High Bun Using Donut

This is a simple but really effective hairstyle to achieve and is fabulous for ballet, school or weekend wear!


1) Pull the hair off the face into a neat high pony tail at the centre of the head and tie with a hair tie.

2) Take the hair donut and pull the pony tail through the middle of the donut.
3) Starting from the top push the hair over and around the donut and pin as you go to keep the hair in place. 
4) Once the donut is covered neatly with hair take the ends of any length of hair left and wrap around the base of the bun pinning in place.
5) Choose any ribbon of your choice and wrap this around the base of the bun using pins if required to keep the ribbon in place.  Tie Ribbon into bow.


Tuesday, 24 September 2013

Girls Hairstyles - Side Lace Braid

This is a side Lace Braid which is great for keeping a fringe/bangs out of the face and also gives some real interest to any type of hair!


1) Make a side parting and take a small section of hair from the front.  
2) Begin to plait/braid as if you were making a French braid but only add in hair from the top into the braid. 
3) Continue braiding taking only hair from the top until you have reached the crown.
4) Finish off with a simple braid/plait securing at the end.

Saturday, 21 September 2013

Girls Hairstyles - Triple Topsy Tail

This is an easy tutorial on how to create a Triple Topsy Tail:


1) Section off the top part of the hair and tie with a small elastic (this is great if you want to get a fringe/bangs off the face).  Take your topsy tail and push through the hair above the elastic, thread the pony tail of hair through the topsy tail and pull the topsy tail down and under.
2) Section off the middle section of hair and include the 1st pony tail. Repeat step 1.
3) Take the remaining hair including the pony tail from 2nd topsy tail and tie again.  Repeat steps as above.

N.B: You can achieve the same effect without a topsy tail by making a hole through the hair behind the hair tie and pulling the pony tail over, through and under.


Friday, 20 September 2013

BaByliss Waving Wand Review


As you may already know I have banned myself from using my straighteners, so in my attempt to give my hair an actual style and not just a load of frizz I have purchased a BaByliss Waving Wand for £25.47.

I was looking for a way to tame the frizz and found some advice online on how to use a curling wand.  It looked very simple and only took 10 to 15 minutes to do your entire hair.  Also the look was meant to last for up to three days which would mean less heat styling and therefore less damage to my hair.

I checked out Amazon and found this waving wand which had great reviews from many people.  At £25.47 I thought it was worth a go and decided to treat myself! ;)

How To Use:
To get the best results I was told to use this wand on dry hair and section my hair into 3 layers.  Starting with the bottom section hold the wand down and wrap a 2" piece of hair away from your face going down the wand and hold each piece for up to 10 seconds.  Do this around the entire lower section and then follow the same technique for the middle and top sections.  Once finished pull out the waves gently using your fingers and then spray with hairspray to finish.

Here is the picture of my hair after (Day 1):


Day 2:


Day 3:


My Review:
Personally I find that I have to leave my hair wrapped around the wand for about 20 seconds in order to achieve a good wave. It is very quick and I am able to curl my entire head of hair within 15 minutes.  I have been leaving my hair to completely cool whilst getting the kids ready and then I pull the waves out with my fingers spraying under my hair with hairspray and also on top to hold all the waves.  As I have also been trying to wash my hair less (see In With The New) I have found that the waves last through the next day and even into day three!  This means less heat styling and hopefully less damage!  I am really impressed with this product and would highly recommend you try it for easy to create waves/curls - Love it!

Follow Me On Bloglovin

Tuesday, 10 September 2013

...In With The New!

In With The New

Further to my previous post #BadHairDays and Out With The Old I am now really concentrating on getting my hair back to a healthy state and I have decided to update my hair products:

I have been researching on the net and this is what I have come up with: Rehab shampoo from Lush, Label.M Organic Lemon grass conditioner, Pure Coconut Oil, 100% Argan Oil and TRESemme Keretin Smooth heat defence spray. To be honest some of these products are not cheap (Rehab, Label.M & Argan Oil) but they are are all natural products not one chemical in site! The Coconut Oil is really cheap at around £2.00 and I have found it available from Superdrug and also the Sainsburys pharmacy.  The TRESemme is also reasonable and available from supermarkets and other beauty stores.

New Hair Product Reviews: 

Lush Rehab:   

This shampoo uses natural ingredients and smells really fresh. You only need to use a small amount so the bottle lasts a really long time and as I have tried to cut down to washing my hair only three times a week it should last even longer.  It lathers well and my hair feels really clean after using.

Label.M:  

This is an organic lemon grass conditioner.   I really like the fact that it is organic and all the ingredients are natural – no chemicals!  It makes my hair smell lovely and after it was very soft.  This conditioner is really quite expensive but it was a gift and I am trying to use it sparingly.  It might be a good idea to put it on your Christmas List!

Coconut Oil: 

This smells lovely and it is 100% natural and cheap too! Coconut oil is meant to have a special quality where it actually penetrates the hair shaft rather than just sitting on the outside and can therefore do some good for your hair from the inside out.  I have been using it once a week as my hair is in quite bad condition right now.  I put it on before I go to bed and really massage it into my scalp and down through the ends of my hair.  I then tie it up loosely and lay a towel over my pillow while I sleep.  In the morning wash your hair as usual and if needed shampoo it twice to remove the oil.

TRESemme Keretin Smooth:  

I saw this recommended on the internet as a good heat defence spray and decided to try it for myself.  It seems to be doing a good job now but as I have cut right down on my heat styling I haven’t had much chance to notice any improvement yet.

Argan Oil: 

The brand I am using is 100% pure and organic.  You may as well use pure Argan oil instead of using a hair product with just a small amount of Argan oil added and you will benefit more from using the pure Argan oil. I have heard only good things about this oil and there are a variety of ways to use it.  I have been using it as soon as I have washed my hair.  Just use a small drop and then run it through your hair.  I am using this instead of the serum I was using before as it is meant to have the same benefits and more.

I have obviously only just started using these products so will post an updated review in a few weeks....

Out With The Old...

Out With The Old

So here is a picture of all my hair products which I have been using over the last few years:  

As I was washing my hair every day I would use John Freda Colour Renew shampoo and conditioner three times a week (as per bottle instructions) and the other four days I would use Alberto Balsalm Coconut & Lychee shampoo and conditioner this is super cheap at around a £1 a bottle.  Also I would treat my hair to L'Oreal Professional Intense Care Masque twice a week after shampoo and conditioning.  Although the L'Oreal Masque is more pricey it lasts for quite a while and really makes your hair feel soft after use.  

After getting out the shower I would use either a Toni & Guy serum or the Avon Advance Technique serum and also a heat defence spray - again either Toni & Guy or Avon.

As you may already know I am currently on a rescue mission to save my hair so I have decided to shake it up a bit and get rid of all the old products and try and go a more natural route with the new products...See my next post In With The New.