Showing posts with label Baking. Show all posts

Friday, 14 February 2014

Happy Valentines Day - It's Not Too Late!


Happy Valentine's Day everyone! If you have left it too late to get a present for your loved one or you just want to treat yourself why not try one of these great Valentine's Day inspired recipes?!


4) Chocolate Strawberry Hearts - http://loramore.com/chocolate-strawberry-hearts.html 


Some of these recipes are American so the ingredients list is slightly different to ours in the UK. Click here for a guide on how to convert US recipes for the UK.

Love Sophie...xxx


Thursday, 23 January 2014

Breakfast Tart


Check out this delightful Breakfast Tart taken from The Breakfast Book: Wonderful Recipes and Ideas for Eggs, Bacon, Muesli & More What a great way to change up the usual breakfast time monotony of toast and cereal - great for brunch too! 


Ingredients: 

(Serves 4)
500g Ready To Roll Block Pastry
4 x Large Free Range Eggs
8 x Rashers Streaky Bacon
75g Creme Fraiche
50g Gruyere Cheese (grated)
Fresh Chives Snipped To Decorate
 

Method:

1) Heat oven to 220C and lightly grease a baking tray.

2)  Lightly flour work surface and roll out paastry to 1/2cm thick and cut into 30cm x 20cm rectangle then place on to baking tray.

3) Using a knife score a border about 1cm from the edge of the pastry then pierce the centre of the pastry with a fork.  Brush the border with some beaten egg and put into the fridge for 15mins.

4) Lightly grease a frying pan and fry bacon until crisp then set aside.

5) In a bowl stir the creme fraiche and cheese and season with salt and pepper.  Spread the mixture on to the pastry keeping the border clean.  Lay the bacon on top slightly overlapping the slices.

6) Bake the tart for 15mins turning the baking tray halfway through.  Remove from the oven and using a fork prick any large air pockets in the pastry. Crack the eggs on to the tart spacing them 5cm apart.

7) Return to the oven for around 7-10mins until the egg whites are set and the yolks are still soft.  Decorate with chives and serve immediately.

Thursday, 9 January 2014

Really Easy Coconut Ice

I originally found this recipe in Good Housekeeping magazine and I have tried it out a few times now.  It is really easy to do and looks really effective, great for presents!  

This recipe involves no baking and only four ingredients what more can you ask for?  If you can pick up some pretty jars and ribbon you can present these as perfect homemade presents which look gorgeous but won't cost you the earth.

Ingredients: 

405g Tin Light Condensed Milk
300g Icing Sugar Sifted
300g Desiccated Coconut
Red/Pink Food Colouring

Method: 

1) Line a 15cm x 20cm tin with baking parchment.

2) Mix the condensed milk and icing sugar together then add the coconut (the mixture will be stiff).

3) Spoon half the mixture into the prepared tin and flatten until level.

4) Add the food colouring to the remaining mixture and stir well.  Press on top of the white coconut ice until even.

5) Wrap in clingfilm and leave to set in fridge overnight.  Once set cut into bitesize cubes.

Love Sophie..xxx


Thursday, 2 January 2014

Chewy Chocolate Chip Cookies - No Eggs!

So there are only a few more days left of the school holidays and if you're looking for something to do with the kids why not try baking these really easy and delicious Chewy Chocolate Chip Cookies made with only five ingredients!

I found this recipe when looking for a way to use up some left over condensed milk at the Carnation website.  You can bake the entire mix in one go or you can freeze the dough in small balls and bake the cookies on demand it's completely up to you!

Ingredients: 

 350g Self Raising Flour
100g Chocolate Chips
170g Condensed Milk
225g Softened Unsalted Butter
225g Caster Sugar


Method:


1) Preheat the oven to 180C and cream butter sugar and milk until light and fluffy.

2) Mix in flour to create a soft dough then add the chocolate chips.

3) Roll the dough into walnut size balls and pace on tray flattening them slightly.  Make sure you leave enough room between the balls as they will spread.  Bake for around 20mins and cool on a wire rack.


Thursday, 28 November 2013

Banana Muffins

I was looking for another idea to use up our over-ripe bananas at the weekend (it seems we have a lot of these soft, spotty bananas in our house by the end of the week) and came across this great recipe at a fab blog called This Mummy  The recipe makes 12 muffins, it's very easy and quick to make and as Laurenne says, not to bananary! I also added chocolate chips to mine and made some little cases for these muffins using baking paper squares pushed into the silicone muffin moulds. Here is the recipe:


Ingredients:

125g Butter
150g Caster Sugar
A Few Drops Of Vanilla Extract
1 x Egg
2-3 x Bananas Mashed
190g Self Raising Flour
60ml Milk

Method:

1) Preheat oven to 180C

2) Heat butter and sugar until melted (you can do this in a microwave or in a bowl above a pan of boiling water).

3) Add the vanilla and bananas and str to mix.

4) Add the egg and stir then sift in the flour.  Add the milk. (I also added white and milk chocolate chips at this stage).

5) Pour the mixture into the muffin cases and bake in the oven for around 20mins or until golden and cooked through.

There are loads of great posts on Laurenne's Blog so please pop over to her and check them out!

Sophie...x

For more tasty recipes featured on my blog click here.
 

Thursday, 21 November 2013

The Easiest & Tastiest Lasagne!

This is my absolute favourite go-to recipe and I make it all the time whether it is just for me, hubby and the kids or whether I am having a bigger get together with friends and family.  


It is perfect served with breads and salad and its' a real winter warmer.  It is also the most easiest meal to make and so tasty too! You should really give it a go!


Ingredients:

500g Minced Beef
1tbsp Olive Oil
1 Onion
1 Carrot
1 Pepper
Jar of Italian Tomato Sauce
Tin Condensed Mushroom Soup
1/2pint Milk
Lasagne Sheets (Dried)
Grated Cheese (Mozzarella or Chedder)

Method:

1) Add olive oil to a frying pan and fry chopped onion, carrots and peppers. (You can add other veg too if you like i.e. mushrooms or celery).

2) Once the veg is softened add the minced beef and fry until browned.

3) Add the ready made Italian tomato sauce i.e. Dolmio and stir.  Reduce heat and simmer for 15 mins.

4) Whilst the meat and sauce is cooking prepare the white sauce by adding milk and soup to a jug and stir well to mix. 

5) When the beef is ready add half of the mixture into a casserole/lasagne dish and top with a layer of lasagne sheets.  Pour half the milk/soup mixture over the top of the sheets evenly.

6) Repeat as above adding a layer of beef then a layer of lasagne sheets and top with the remainder of the white sauce.

7) Top the lasagne with the grated cheese of your choice and cook in the oven for 45mins at 200C/Gas 6 until golden.

I hope you like this recipe! For more recipes please visit my Food & Baking page! 

Thursday, 14 November 2013

Pizza Rolls

These pizza rolls are incredibly easy to make and really taste good.  As chief lunch box maker I do sometimes feel despondent  at the thought of another daily lunch box making sesh, so these are great to make at the weekend and store in the freezer.  When you need to provide an easy yet scrummy lunch all you have to do is whip these bad boys out and send them on their way (the family and the pizza rolls)! 


1) Make your dough, I make mine using a bread maker all you need to do is tip in the correct ingredients, press start and wait for 90 mins.  If you don't have a bread maker you can easily make your own dough using a recipe on the net.

2)  Once the dough is ready to handle, roll out into a large rectangular shape using a rolling pin (see below).

3) Using ready made pizza sauce or red pesto or even your own home made sauce cover the dough thinly. Grate some cheese and sprinkle over the top of the pizza sauce (Quick Tip: Don't be tempted to add too many toppings - less is more).

4) Roll the covered dough carefully into a swiss roll shape and cut into sections around 1-1/2" wide.

5) Place the cut rolls/sections onto an oven proof tray lined with baking paper and cook in a oven set to 200C/Gas 6 for around 20 mins or until golden and firm.


It's NaBloPoMo #14 today! For more Blogs please visit Vonnie at http://nowtspecial.wordpress.com.  You can also find me on Facebook and Twitter just click on the Links to the right! 

Thursday, 7 November 2013

Blondie Brownies - Lovely!

For NaBloPoMo #7 I thought I'd bake a batch of these lovely sweet Blondies and store them in my freezer for (pretty much) instant gratification!  

I thought you might like to try these for yourselves as they are incredibly tasty!


Ingredients:


125g Butter
200g White Chocolate, chopped
2 Eggs
100g Golden Caster Sugar
1/2 tsp Vanilla Extract
130g Plain Flour
1 pinch Salt
50g Glacé Cherries


  • Method:

1) Heat oven to 180C/Gas 4 and line or grease a baking tin.

2) Melt butter and white chocolate in microwave or over a pan of simmering water and allow to cool slightly.

Wednesday, 6 November 2013

Buns In My Oven

So its NaBloPoMo #6 and today you should take a trip to www.bunsinmyoven.com and visit a fellow blogger across the pond!  

I love Karly's Blog, she is so funny and witty and her recipes are pretty indulgent too!  Obviously she is an american so the recipes are american and a little tricky to translate but putting this aside I find myself druelling at the mere thought of pretty much all of Karly's recipes on this blog!  


I think its safe to say that none of these recipes are particularly kind on the waistline ;) but they do look like they taste fabulous!  Here are my top 3 recipes!


2) Creamy Baked Spaghetti


3) Buffalo Chicken Burgers


Please take a look at this fabulous Blog - I think you're going to love it!


Tuesday, 29 October 2013

Halloween Tasty Treats

This Halloween my girls have a few friends coming over for a Halloween tea before we go out on our annual Trick Or Treat trip around the crescent we live in.

Here are some Fab ideas I will be using to create a fabulous spooky treat for my little guests:


1) Ghostly Banana Pops:

Cut bananas in half and insert a lollipop stick into the cut side. Dip into melted white chocolate and cover. Place in fridge to set and apply face using melted milk chocolate or raisins. 


2) Orange Pumpkins:

Cut the top off of an orange and scoop out the flesh. Wash and dry oranges and using a sharp knife cut out the pumpkin face. Fill with small sweets.


3) Mummy Hotdogs:

Roll out puff pastry approx 3mm thick and cut into thin strips. Wrap the pastry strips around the hotdogs in a mummy-like manner and place on baking sheet.  Bake in oven set to 200C for 15-18 mins.  Add eyes using a dot of mayonnaise, mustard or ketchup.


4) Eyeball Spaghetti:

Cook the spaghetti according to packet instructions.  Meanwhile cut a small hole into mini mozzarella balls and push in half an olive.  Drain spaghetti and stir through some pesto.  Top with splodges of tomato ketchup and mozzarella eyeballs.


Thursday, 24 October 2013

Chicken Pesto Pasta Bake

Enough of the sweet treats this week, here is something to try for dinner and it's absolutely gorgeous even if I do say so myself! :-) Please excuse the rough Ingredients and method on this one as it was created by myself and I just made it up using the ingredients from my kitchen.


Ingredients:


350g Jar Tomato Pasta Sauce
500g Fresh Penne Pasta 
Handful Baby Tomatoes
2 Chicken Breasts
80g Bacon
125g Mozzarella
Green Pesto
Croutons (home made or shop bought)


Method:

1) Add fresh pasta and jar of sauce into oven proof dish and stir to combine.

2) Cook chicken breasts and bacon and add to pasta stirring to combine. 

3) Slice or tear mozzarella and place on top of pasta along with baby tomatoes sliced in half.

4) Bake your own croutons made from stale bread or use shop bought and add to top of pasta along with a few teaspoons of green pesto drizzled over the top.

5) Bake in oven for 25 to 30 mins at 200C and serve!

Thursday, 17 October 2013

Banana Flapjacks


I found this recipe on NetMums  and it was really easy to make., These flapjacks are especially great for using up over ripe bananas and also fab for sticking in the freezer and will thaw in around 15mins so really useful for adding to lunch boxes!


Ingredients:


80g Butter
120g Brown Sugar
2tbsp Golden Syrup
450g Porridge Oats
100g Raisins
2/3 Ripe Bananas


Method:


1) Melt butter, sugar and golden syrup in a pan or in the microwave.

2) Mash bananas and add to melted ingredients with raisins and oats and mix.

3) Spread mix into a baking tray lined with baking paper and flatten using the back of a spoon.

4) Bake at 200C/Gas 6 for 15-20 mins until golden.


EASY!!


Thursday, 10 October 2013

Doughnut Muffins

Wow these are really good and they went down a storm in my house! Try these Doughnut Muffins out for size courtesy of BBCGoodFood!


Ingredients:

140g Golden Caster Sugar
200g Plain Flour
1tsp Bicarbonate Of Soda
100ml Natural Yoghurt
2 Large Eggs Beaten
1tsp Vanilla Extract
140g Butter Melted
12tsp Seedless Raspberry Jam


Method:


1) Heat oven to 190C/Gas 5 and lightly grease 12 hole muffin tin or use a silicone one.

2) Add sugar, flour and bicarbonate of soda to a bowl and mix together.

3) In a jug whisk together yoghurt, eggs and vanilla extract.

4) Add whisked ingredients with melted butter to dry ingredients and fold quickly using a metal spoon.

5) Divide two thirds of mixture between 12 muffin holes and carefully place a teaspoon of jam on top of each one. Then cover jam with remaining mixture.

6) Bake for 16-20 mins until golden and springy to touch. Leave muffins to cool then brush with some melted butter and roll the tops into more golden caster sugar for a great crunchy topping!

Enjoy, I certainly did! ;-)

Thursday, 3 October 2013

Rainbow Rice Krispie Cakes


Here is another weekend recipe I created for my family - it is really quick and easy to prepare and delicious too!


Ingredients: 


3tbsp Butter/Margarine
200g Marshamllows
250g Rice Crispies
150g Smarties

Method: 


1) Place Butter/Margarine and Marshmallows in saucepan or microwave until melted.

2) Add Rice Crispies and Smarties and stir until coated.

3) Pour mixture into tin lined with baking paper and put in fridge until set.

4) Turn out set mixture and cut into squares with knife.  

Quick Tip: Eat Quickly, ideally within 24hrs for best results. Yum!


Wednesday, 25 September 2013

Coconut Cherry Choc Tray Bake

I tried this recipe at the weekend and not only was it really easy with only 5 ingredients but also really tasty too! Thanks to http://mummyheartsyou.wordpress.com/ where I originally found this recipe. You can also find it at BBC Good Food!


Ingredients:

200g desiccated coconut
85g caster sugar
2 eggs, beaten
200g bar white chocolate, roughly chopped
85g glacé cherries, halved

Method:


1) Heat oven to 180C/160C fan/gas 4 and line a 20 x 30cm baking tray with baking parchment.

2) In a large bowl, mix the desiccated coconut, sugar, eggs, white chocolate and glacé cherries until combined.

3) Cook for 20 mins until golden brown and set.


4) Cool in the tin before slicing into bars.

Monday, 9 September 2013

Mmmmm....My Home Made Birthday Cakes! (Pizza)

Pizza Cake for Brooke's 6th Birthday:

Pizza Cake
So Brooke decided she would like a pizza party for her Birthday this year and a pizza cake to match! Again I exhausted Google and did as much research on pizza cakes as I could! :)

1) Using my super easy sponge recipe I made one large cake in a 23cm/9" tin.  Quick Tip: As I didn't need the cake until the following day I wrapped it tightly in cling-film which really keeps the sponge moist and fresh.
2) On the day I used white sugar paste icing and dyed it black using a gel food colouring. Once you have made your black icing roll it out into a thin strip slightly higher than the height of your sponge.  Using a bit of jam around the side of the sponge 'stick' the black icing to the side of your cake and roll slightly at the top to make your 'pan'.
3) To make the 'toppings' I used strawberry jam to make the pizza 'sauce' then grated white chocolate to make the 'cheese' and sprinkled it over the top of the jam. Quick Tip: You want to put the toppings on at the last minute as the edge of your sponge cake will be on show and open to the elements this will cause the sponge to harden faster than if it was covered with icing.
4) To make the 'toppings' I used coconut mushrooms sliced in half, tinned pineapple chunks from a tin cut in half and I made the 'pepperoni' slices out of sugar paste icing - To make the pepperoni shaped icing I simply added brown and red food colouring gel to a small amount of white sugar paste, kneaded and then chilled. I rolled out the icing on some non-stick baking paper and used a round cutter to cut out the circle shape. Quick Tip: If you want, add really tiny bits of black food colouring using a cocktail stick to give the pepperoni a slightly more realistic look.  

That's it! - a really easy and quick Pizza Cake! :)

Friday, 6 September 2013

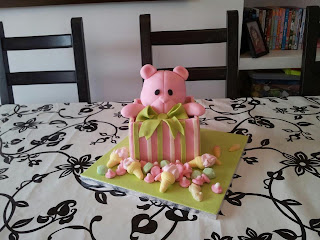
Mmmmm....My Home Made Birthday Cakes! (Teddy Bear)

This is the first major Birthday cake project I have ever done, it was for my youngest daughter, Sasha's 2nd Birthday:


Teddy Bear Cake

I made this from a book I have called Gorgeous & Gruesome Cakes For Children by Debbie Brown - Sasha had a teddy bear themed party and I think this cake design is so cute! This did take quite a long time to make however, maybe three evenings of my time and some help from my patient engineer Hubby too! 

1) Cover the cake board with rolled out green sugar paste (I bought all the icing already coloured but you could dye your own).
2) Bake the square cake using two 15cm square cake tins.  Quick Tip: I used a sponge recipe from the book which is pink as you add red jelly, it also uses more flour than a usual sponge recipe to create a firm texture. Trim the crusts from the square cakes and slice a layer through each.  Stack the cakes on top of a square cake card using a butter-cream filling in between each layer then crumb coat. Lay more green sugar paste on top of the cake and make sure it is smooth then cover the sides of the cake in pink sugar paste.  You can use edible glue to secure the joints. Push three dowlling rods through the centre of the box making sure they just reach the top ready for the bear.
3) To create the teddy I baked two cakes in a pudding bowl then had my lovely husband carve the bowl shaped cakes into semi-spheres which I sandwiched together using butter-cream. Once the head was together I crumb coated it with more butter-cream and laid more sugar paste over it in pink.  Cover a small circular cake board with pink sugar paste in a dome shape - this is the bear's 'body' and place this on top of the dowling poles in the box.
4) Roll out cream and green sugar paste in different sized strips using a ruler and stick around the box to create the stripes.
5) Roll out the nose section out of more pink icing in a tear drop shape and then press down slightly and attach it to the front of the teddy's face (the round cake) add a small ball of pink icing to make his actual nose.  Once this is in place add the line around his head to make him look more like a teddy bear.  Make the ears out of small icing balls pushed down then roll out the arms into sausage shapes.  Lay the arms from the bears neck over the edges of the box.
4) To make the bow I use green coloured sugar paste.  Making a flat leaf shape first and then loop over - stick a ball of icing into the middle.  To make the tails of the ribbon cut two strips into some rolled out icing narrower at one end and cut a 'V' into the larger end. Apply the bow to the front of your bear. Roll two small eyes out of black icing for the bear's eyes.
5) I bought the sweets in similar colours to the cake from a local sweet shop and scattered them on the board to finish! 

Voila! :)


Wednesday, 4 September 2013

Mmmmm....My Home Made Birthday Cakes! (Rainbow)


The Rainbow Cake

To make this cake I used 2 x 8" sandwich tins which I used 3 times each to bake the different coloured layers.  Of course if you have more tins of the same size it would probably be easier and you would have to do less washing up but I was trying to save money! ;)


1) Make up a good sponge cake mix and times the quantities by two (you can find my favourite recipe if you go to my main page).  Divide the mixture between six bowls you can do this by eye or use the scales to try and weigh it out.
2) Using gel food colouring, add into each bowl of mixture a few blobs at a time until you get the required colours.  Although I made six layers I only used 5 colours they were: pink, yellow, green, blue and purple. To make the red colour I just used extra of the pink dye to the 'red' bowl and less in the pink bowl to create different shades.
3) Pour the mixtures into separate tins and bake for around 15-20mins each.  Once baked allow to cool.
4) Where each cake has risen in the oven trim each one so they are flat on the top and therefore easy to stack then eat the left over tops - yum!
5) Stack the cakes using butter-cream in between - try and put on an even layer of butter-cream as you will see this when the cake is cut open and you want a dramatic effect. Once all the cakes are layered, crumb coat the entire cake with more butter-cream (I always cheat and use Betty Crocker's butter-cream as I use a lot of it, it saves time and it tastes lovely!) Put the cake in the fridge to let the crumb coat harden for a maximum of half an hour.
6) Remove the cake from the fridge and using a spatula cover the entire cake with yet more butter-cream.  I have added coloured chocolate beans to finish. Here it is:

My Favourite Sponge Recipe ...and soooo easy too!


Ingredients:

200g Caster Sugar
200g Softened Butter
4 Eggs
200g Self-Raising Flour
1tsp Baking Powder
2tbsp Milk


Method:


1) Heat oven to 190C (170C Fan/Gas5) Butter two 20cm sandich tins and line with non-stick baking paper (I place the tin on the top of the paper and draw round with a pencil then cut out with scissors).

2) In a large bowl cream together the sugar and butter. Add the eggs and beat together. Add Flour and baking powder and mix until you have a smooth soft batter.  Add the milk if needed to get a good consistency.

3) Divide the mixture equally between the tins and smooth the tops then bake in oven for approx 20mins although I would check after 15mins to be on the safe side. The cake is ready when it looks golden and I would also test the inside of the cake by using a metal skewer. If the skewer comes out dry the cake is ready, if there is wet mixture on the skewer leave in for a little longer and repeat the test.

4) Remove cake from oven when ready and leave on a cooling rack until completely cool. 

Quick Tip: If you have had to make this cake in advance I wrap it tightly in a few layers of cling-film and leave on the side.  I find the cake is much softer and lighter if you use this method and have made a cake up to two days in advance and it is still fresh and tasty!

Mmmmm....My Home Made Birthday Cakes! (Rapunzel)

So this is a cake I made for my daughter Brooke's 5th Birthday 

The Rapunzel Cake

I made this cake at my daughter's request to go with her Rapunzel themed Birthday party. I spent ages researching other Rapunzel style cakes and techniques on the internet - once I had gained enough inspiration I came up with this!

Rapunzel Cake

1) To start I made the tower's house and roof - I made it out of a rice crispie mixture (microwave marshmallows and butter and stir in rice crispies) once I had a mould-able consistency I made it into this shape: 

Quick Tip: To stop the rice crispie mixture sticking to your hands keep your hands oiled with Trex or use some vegetable like I did.

2) Once this was done I left the house and roof in the fridge overnight to harden.  

3) The following day (the day before the party) I baked the main base cake (I'll post a basic sponge recipe if you would like to use it) in a round tin and once cooled I covered it in green butter icing which I dyed using a green gel food colouring.  (The gel food colouring is far superior to the liquid food colour in my opinion and although slightly more expensive it lasts for a really long time.) 

4) Next I made the tower itself using a large shop bought swiss roll and some white sugar paste which I dyed a purpley/grey colour.  My husband helped with this part and rolled the icing fairly thin.  Covered the icing in smooth jam and then wrapped the swiss roll in it by rolling it along the worktop.  We then smoothed the join with a little bit of water.  We covered the 'house' part of the moulded rice crispies in the same way. 

5) Small Details came next. To make the tiny tiles for the tower roof and also the little bricks which were randomly placed over the swiss roll tower (see main photo and photo below)  I used a purple food colour and kneaded it into some white sugar paste, I then rolled this out fairly thin and using a ruler and a knife made lots of tiny square 'tiles' which were placed on the rice crispie roof.


To make the small bricks that are on the main tower I made small cubes of sugar paste dyed different shades of purple and squashed them flat using my thumb.  Using a tiny bit of water I then stuck these onto the icing covered swiss roll.  To decorate the house part of the tower I dyed yet more sugar paste brown and made skinny sausage shaped rolls and a door shape to make it look like wood panelling.

6) To finish I had to 'build' the tower and fix it to the cake base.  To do this I used three dowling poles (food safe plastic poles bought from a local cake supply shop) which my husband cut into different lengths for me. Push three short poles into the crispie house and push the swiss roll into the other ends.  Using longer length poles push into the cake until they reach the cake board and make sure the poles are long enough to come through the cake and half way up through the swiss roll.  Gently lower the swiss roll tower onto the poles to secure. Once the tower is in place add the tiled roof carefully. Finally I piped green coloured butter-cream icing down the side of the tower which made it look a bit overgrown and also helped cover up the icing join, I then added some shop bought edible flowers to finish.  The Rapunzel figure was bought from Amazon and although a bit pricey it acted as a keepsake once the party was over! 

I hope this gives you some inspiration and is not too complicated! Although a little time consuming I think it looked really effective and I received a lot of compliments - I hope you do too!  Feel free to ask me any questions if you need some help! :) x